
Revell: 1/40th scale Nike Hercules Missile
by Mark Murray

First… a little History. This missile system was developed by the Douglas Aircraft Company, in conjunction with Bell Telephone Labs & Western Electric Company. Knowing that these last two companies were contributors to this system, I found I had a somewhat personal link to this kit. I found out many years after the Nike system was developed, that my father was one of the many techs that was involved with the testing & development of this system. Kind of answers why he knew so much about them when we saw the radar complex out on the Chicago lake front when we went fishing near there when I was a kid.
The Nike system progressed from the original Nike Ajax, a small but capable anti-aircraft missile of the time, through the larger & faster Hercules & on to the final evolution to the even more powerful Nike Zeus. Some of the specs of the Nike Hercules are as follows:
- Length – 41’6”
- Diameter – 31.5”
- Span – 74”
- Launch Weight – 10,405 lbs.
- Range – 87 miles
- Effective Altitude – 150,000 ft.
- Speed at burn out – Mach 3.85
- Warhead – Nuclear
It would seem that this system was looking to be effective towards the possibility of the Russians launching a Bomber force in an attack against the United States. Remember, this was all developed during the “Red Scare” of the 50’s & 60’s. Many of these missile batteries were located along Lake Michigan and surrounding suburbs to protect the Greater Chicago area from those scheming “Russkies.”
The Kit:
This is a classic kit from the 50’s. Yes…I said the 50’s! Some of you may not know it, but they did have plastic model kits back then. I know you young’uns think those of us over 55 whittled our models out of stray tree branches & hunks of balsa wood from the local hobby shop, but they really did have plastic kits long before the likes of Trumpeter, Hobby Boss & G.W.H.
This Revell kit show’s its age from the © imprint for 1959 on one of the rear fins on this kit. Boy, talk about making a guy feel old! However, upon opening the box, I was a bit surprised to find that even with the age of the kit, while there was some flash on the parts, it was actually quite minimal. And it was molded in a wonderful olive drab/Army green color. Also, upon further inspection, I did find that this build was going to be a minor challenge. I noticed while piecing parts together to check overall fit, it wasn’t going to be as nice as present kits. Where we’re all used to having shake n’ bake kits that just about build themselves. I also noticed that there must’ve been about 50,000 rivets molded on this thing! Not Good! As going on the internet for reference, it’s found that there we’re very few rivets on the actual Missile. So, A LOT of sanding was going to be needed, to get this kit to look somewhat presentable.
 The build procedure actually involves two sections. Or basically two kits in one, the missile itself & the launch gantry. I started out building the Missile, as it looked to be the easier of the two sections. I soon found that assumption was wrong. First, the fit of the fins to the missiles main body were a tad….sketchy at best. As the fins had a bit of lengthwise bow in them, & the tabs that inserted into the main body needed a bit trimming to give a good fit. Then, once installed in the shallow trench provided for their location, one finds there’s a bit of a trough at the base of the sides of these fins that’ll need filling. The booster section also provided some extra work in that, to get the upper & lower sections of it to mate, one has to do some sanding & trimming of the joining areas. Not to mention sanding out the joint lines of the booster halves & trying to keep them round. The fit of the tail fins was another exercise in frustration. Finally solved by getting each fin located exactly where I wanted it & applying sizable amounts of super glue gel, on the inside of the booster base followed by accelerant to keep the fins in place.
which were taken care of by the liberal application of Mr. Surfacer & a good sanding of some of the part seams in the launch rail itself. For a kit of over 50 years old, this part was relatively easy to build. And when done, the rail would still rotate up & down.
I did eventually glue the gantry in a roughly 50 degree pose. Painting of the gantry was done with various shades of Testors Dark Olive Drab, Field green, and Light Olive Drab. Lightly over-spraying the last two coats to give some contrast and definition to an otherwise boring piece of equipment. This was followed by a touch of the raised bolts & such with a light green colored pencil, along with the walk platform getting rubbed with a sliver colored pencil. This was later supplemented by running a thin bead of super glue liquid to the base of the fins on the outside sanding them in. Finally…..with the upper & lower stages of the missile assembled, I set to sanding the rivets off both sections. And sand I did….and sand….and sand…..and sand some more!! It was during some of this never ending sanding that I thought to get away from the pile of powdery green plastic I’d created from all the sanding of the missile itself, that it might be fun to start building the launch gantry.
After the application of the decals, the gantry was dulcoated & ready for the Missile.
 Aaaah yes…..back to the Missile. Once all the sanding of the trillions of rivets, as well as the filling of the recessed panel trenches in the fins with more liberal amounts of Mr. Surfacer and followed by even More sanding, I sprayed several coats of Testors Flat White on the bottom fins & the entire second stage. I once again sanded this to level out the paint & blend in any areas that needed further attention. This was followed by one more coat of Flat White, allowed to dry for several days & then finally sprayed with several passes Testors Gloss White. I sprayed the booster section Dark Olive Drab & did some touch-up sanding there as well. Once cleaned up, I sprayed a final coat of Dark Olive Drab to this area & let the entire kit dry for about 2-3 weeks. Once everything was totally dry, I applied Tamiya Gloss Clear to the upper stage. Once dry, I applied the decals, these being just the U.S.Army items. There are several other tiny little stencil decals in the kit, but looking at my research, I found that few if any of these stencils were actually applied. After a final coat of Tamiya Gloss, I left it to dry for another few days. Final sheen was achieved by rubbing the gloss with a dry paper towel.
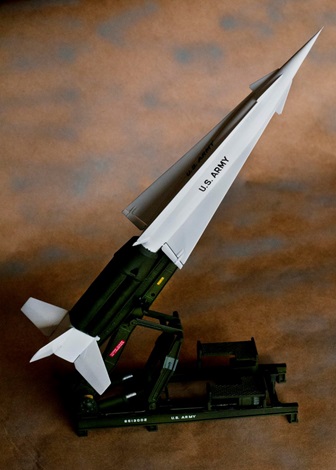
With both sections done, I mated the Missile to the Gantry. VIOLA! A Finished Kit!!! I built this kit for the January club theme night of “Something Illinois.” As stated in the beginning of this article, a lot of these Nike Missile Batteries were located around the Chicago suburbs as well as the lake front. There are still some reminisce of these sites scattered around long after they were deactivated & moved out. One such site is near the house of our fearless leader “The Tick.” Other sites can still be seen throughout the Chicago & northern Indiana area.
In closing, this was actually a fun build. It was something different for me, & while not a perfect kit, it still looks great as a nice clean build.
