OCT 31, 2015: The Navy Cross was earned 50 years ago
Here is the story of Magic Stone 466
Article by Don Jay
Lieutenant Commander T. R. Powers in A-4E BuNo. 151173 side number AH 466 was shot down by triple A, over North Vietnam. Lieutenant Commander Powers survived the ejection and was captured by the North Vietnamese and was murdered by the North Vietnamese while in captivity. He was awarded the Navy Cross.

Magic-Stone 466 at top
In 1965, Russian SA-2 Surface to Air Missiles (SAMs) had begun to appear in North Vietnam. Previously, US aircraft were able to fly over their targets unmolested at 15,000 feet-plus to begin a dive bomb attack. The newly arrived SAMs canceled out that high altitude sanctuary and forced pilots down low where anti-aircraft artillery (AAA) fire was intense, withering and often deadly.
This new SAM threat caused the USAF and USN to cooperate in seeking a solution. The 2nd Air Division at Tan Son Nhut AB, arranged with the Navy to have Navy AN/APR-23 equipped A-4Es fly with the F105 wings out of Takhli and Korat. The A-4s would be the pathfinders for the ‘Iron Hand’ F-105s. The Thuds at this time had no homing or electronic warning gear.

A-4E of VA-164 in Oct 1965
Navy LCDR Trent Powers landed his A4E Skyhawk at Korat carrying his own Mk 82 500-pound snakeye bombs & Zuni rockets. Powers was the XO of the USS Oriskany’s VA-164 squadron. The Navy had sent the very best. Powers knew this was a big time White House directed mission, and dangerous. His call sign was “Magic Stone 466”.
On this date LtCdr Powers led 8 F-105s to attack a SAM site 5 miles SW of Kep. Each Thunderchief would carry eight Mk-117 750 lb. bombs. At the same time a joint USAF-USN strike mission of 65 ac was conducting a strike on the bridge at Kep. These type missions were called Dooms Day missions; because invariably someone got shot down from the intense AAA around Hanoi and now the added SAM threat-but there was no shortage of volunteers. A total of 27 SA-2s would be shot at this package.
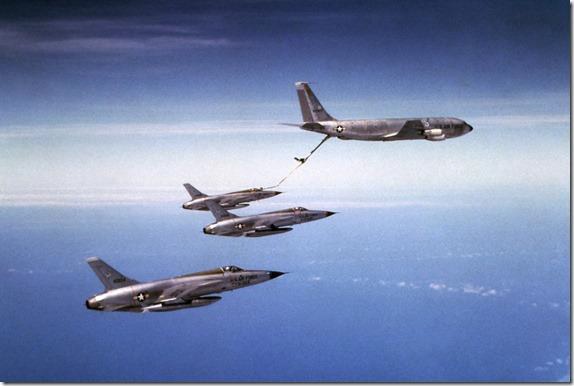
F-105Ds on tanker
LtCdr Powers wanted to fly across the target level at 50 feet and skip bomb with his high drag snakeyes. The Thuds preferred to dive bomb, using a pop-up from the deck to create a dive bomb run. This made it tougher for the ground gunners to track us. As Powers would be first across the target and out of the way, his flat pass would not conflict with the dive-bombing Thuds.
Magic Stone 466 had the magic black box (APR-23) or what passed for magic, circa 1965. Actually it was similar to the old semi-worthless coffee grinder ADF (Automatic Direction Finder) device we used in the late fifties in Europe. A needle would point in the general direction of a SAM site, when and if the SAM was in the radar search mode. Operator skill was required to find the target, and that meant Powers was the key player on this mission; one Navy pilot leading eight Air Force bomb laden Thuds in hopes of finding a well hidden missile site.
The package launched, joined up, refueled off a KC-135 and headed north, only to find a solid overcast at the let down point. The mission was obviously a No-Go due to weather. But instead; Powers’ gave a slight wing rock, a wordless command to join in tight nine-ship “V” formation and descended into the clouds. No one would have criticized him one bit if he canceled for weather and returned to base. Instead, he pressed on and the Thuds followed tucked in tightly on his wings. Imagine a nine-ship Vic in cloud, heavy with fuel and bombs, bouncing around-pretty damn exciting.
Nearing the target, the formation finally broke out of the clouds and went to the deck to counter intense ground fire. Spread out and no longer a tactical formation, a gaggle of bomb-laden Thuds were strung out in loose single file trusting their fate to their Navy leader.
F-105 Flight Lead after action report: “…at one point, there were hills on both sides with overcast above making a sort of tunnel. I got slung into cloud during a sharp turn and immediately punched the nose back down desperately hoping for valley beneath instead of hillside. I remember thinking: “I’m not going to miss this mission for anything”. Stupid decision? Probably. “Better dead than to be a f**kup” is the pilot credo. As we screamed low level towards the target I flew so low over a guy driving a farm tractor that he leapt to the ground. He was doing about two knots; we were doing 550 (635 mph). When they are shooting at you: LOW is good FAST is good. Approaching the Hanoi area my jet was hit by small arms fire causing various yellow caution lights to illuminate. On we pressed; we were the goats, tethered to lure the lion out into the open for the kill.”
Until that day, it was a big deal when just one or two SAM’s were launched. Today they were firing them like artillery shells. An EB-66 orbiting over Laos transmitted repeatedly in rapid order the code word warnings for missile “locked on” and missile “launched”.
As they closed toward the general target area, Powers calmly transmitted; “I’ve got’em on my nose, starting my run”. He flew directly over the target at 150’ to drop his snakeyes and mark the target for the Thuds. During his run in he was hit with AAA and caught fire, completing his ordnance delivery, he began a sharp banking climb, hit again, Magig-Stone 466 disintegrated. Powers ejected and a good parachute was seen and his SAR beeper was heard but he never came up voice. Nothing was heard about LtCdr Powers until 1987 when the North Vietnamese returned his remains.

Severely damaged SAM site
The F-105s provided the hard kill of the SAM site. All of them returned-one with 37 holes in the ac. The Thud crews passionately pitched General Simler (2nd Air Division) to award the Air Force Cross to Powers-instead years later Powers was awarded the Navy Cross.
POWERS, TRENT RICHARD
Captain, U.S. Navy
Attack Squadron 164, U.S.S. Oriskany
Date of Action: October 31, 1965
Citation:
The Navy Cross is presented to Trent Richard Powers, Captain, U.S. Navy, for extraordinary heroism on 31 October 1965 while serving as a pilot of jet attack aircraft with Attack Squadron 164, embarked in U.S.S. Oriskany (CVA-34) during a combat mission over hostile territory in North Vietnam. Captain (then Lieutenant Commander) Powers was assigned the demanding and unusual task of leading a two-division, United States Air Force flight into an area heavily defended by antiaircraft artillery and surface-to-air missiles, with the mission of locating and destroying the missile installations. He planned the attack route and led the eight- plane group over more than six hundred miles of unfamiliar, cloud-shrouded, mountainous terrain, arriving in the target area precisely at a prebriefed time that had been selected to coincide with the strikes of two carrier air wings against a bridge. The target area was the scene of an intense air-to-ground battle, many surface-to-air missiles were being fired and heavy enemy antiaircraft fire was observed in all directions. With full knowledge of the serious hazards involved, Captain Powers courageously led the Air Force aircraft into battle. His bombs and those of the Air Force aircraft which he led inflicted severe damage to both missile sites. By his superior aeronautical skill and valiant determination, Captain Powers upheld the highest traditions of the United States Naval Service.
Home Town: Minneapolis, Minnesota

Lt. Cdr. Trent R. Powers
R I P