
John Koziol and his dad with their scratch-built U-505
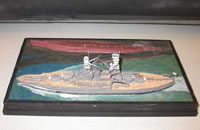

John Koziol and his dad with their scratch-built U-505

Contest winner Bell X-1

Contest winner-Goblin

X-32 model in progress

X-15

Pogo

One of two Goblins

One of two Bell X-1s

Goblin

Flt of the Old Dog B-52
For a pdf version of this article, click here.
When approached to give a presentation on building airliners, I had not a whole lot of experience to look back on or to share with folks. To date, I’ve completed exactly two, an Airfix 727 and DC-9 since I started this project in 1999. So instead I approached the presentation from the “How does one get started in this?” point of view:
When I decided to take my hobby in this direction, I didn’t know any of this. I could tell you the differences between the different versions of the MiG-21, but had no idea the difference between the different versions of the DC-9.
I know why I got started in this side of the hobby, to teach my kids a little family history, but why would someone else? I came up with a couple of reasons. The first was to build a replica of an airplane that they really got a chance to fly in. Few of us have had the opportunity to fly any of the military models we generally specialize in, but most likely all of us have flown in something manufactured by either Boeing or McDonnell-Douglas. The other reason was we tend to build to a special marking, either an ace’s aircraft or something of particular interest. Airline models have this too, because who hasn’t seen the Southwest Airlines’ Shamu or ANA’s Pokemon liveries?
I got started by determining what airliners I wanted to build. Since I was specializing in one particular airline company, it was pretty easy to come up with my list. This list contains the following:
| from the Douglas Corporation | DC-3, DC-6, DC-7, DC-8 (various variants), DC-9 (various variants) and DC-10 |
| from the Boeing Company | 720, 727-25, 727-200, 747-100, 757 |
| from Airbus Industries | A300B |
| from Lockheed | Constellation, Electra, L-1011 |
| from Martin | Martin 404 |
| from Convair | Convair 440 |
Now that I’ve got my list done, I had to determine what was available in plastic and what was not.
Airplane |
Kit? |
Type Kit |
Who |
Notes
|
|---|---|---|---|---|
| DC-3 | Yes | Injection | Minicraft | Readily available |
| DC-7B | Yes | Vacform | Welsh Models | Readily available – Revell made an underscale in the 1960’s, rare but sometimes available through specialists shops for between $50-$100 |
| DC-8-20 | No | Can be made by modifying Welsh -62 kit | ||
| DC-8-61/63 | Yes | Vacform | Welsh Models | Readily available, DC-8-62 version |
| DC-9-15 | No | Can be made from Airfix DC-9-30 | ||
| DC-9-30 | Yes | Injection | Airfix | Readily available |
| DC-9-50 | No | Can be made by extending -30 fuselage | ||
| DC-10 | Yes | Injection | Airfix | Readily available |
| 720 | Yes | Vacform | Welsh Models | Readily available – One may be able to produce a reasonable facsimile by converting a Minicraft 707-320 |
| 727-25 | No | Can be done by modifying Airfix -200 kit | ||
| 727-200 | Yes | Injection | Airfix | Readily available – Minicraft announced release of new 727-200 for 2003 |
| 747-100 | Yes | Injection | Airfix | Readily available |
| 757 | Yes | Injection | Minicraft | Readily available |
| A300B | Yes | Injection | Airfix & Revell | Readily available (Revell kit on rare list) |
| Constellation | Yes | Injection | Minicraft | Readily available |
| Electra | Yes | Injection | Minicraft | Readily available |
| L-1011 | Yes | Injection | Airfix | Readily available |
| Martin 404 | Yes | Resin | Starr Miniatures | Readily available, kit comes without decals |
| Convair 440 | Yes | Vacform | Welsh Models | Readily available |
I decided to make this easy on myself and begin with the readily available injection molded kits. So I purchased the Minicraft DC-3, Electra, 757 and Constellation. From Airfix I got the A300, L-1011, two 727s and three DC-9s.
I was lucky in that some of the kits I purchased already came with Eastern markings, the DC-3, Electra and Constellation. That left me with having to locate markings for the rest. What I found was that since Eastern went out of business in 1991, not too many manufacturers have decals still available. I did some looking on the Web and found several who made them at one time including; ATP Decals, Liveries Unlimited, Flying Colors and Microscale. Now that I found markings, I began to find out where they’d be available.
I’ve found that the decals from Liveries Unlimited and Flying Colors are very easy and forgiving to work with, while those from ATP are very fragile and have a tendency to blow in water. The decals supplied by Minicraft are also all right.
Some more looking at magazines that specialize in the airlines, more yahoo searches o the Web and some information from FineScale and I found several really good shops that catered to the airline modeler.
The first was AirlinersAmerica. I contacted the owner in order to place an order and he let me know that he was going to go out of business before the end of the quarter. So I asked him to send me one of every decal sheet he had that contained Eastern markings. From here I got markings for a DC-9-50, L-1011, DC-10 and 727.
The next shop is Hannant’s, out of England. Nice shop and very easy to mail order from. I was able, with a good exchange rate, to purchase the Airfix L-1011 and A300, along with decals for the DC-9-30, A300 and two different liveries for the 757.
After running Hannant’s dry, I found one other mail order here in the states, Airline Hobby Supplies. From here I purchased detail sheets for the DC-9, 727, 757, L-1011, DC-8 and 720. I also purchased several sheets of coroguard decals for the DC-9, 727, and L-1011.
Finally, I keep an eye on eBay about once or twice a week. It was here that I found several out of production sheets for the DC-9-15 and 727-25. My recommendation is to go to the advanced search, and look for an item that contains a keyword of the airline you’d be looking for, what your looking for and the scale. For example, one of my searches is Eastern 1/144 Decals. This gives me a list of all items that contain these three words.
Hannants: http://www.hannants.co.uk
Airline Hobby Supplies: http://www.airline-hobby.com
eBay: http://www.ebay.com
Now that I’ve acquired more stuff than I’ll ever build, I needed to find out where to get reference materials on the cheap. For this I, of course, turned to the Web. I started with the IPMS/USA web page, hoping to find Airliner SIGs. I found several and they led me to the sites I’ve used most frequently.
For photographs, I found Airliners.Net to be invaluable. On this web site you can search their bank of photographs by airline and airplane. So a search of Eastern and Electra, yields about 15 color photographs of Electras in Eastern markings.
I also needed a little background information on the airline, so I found the Airline History Website. On this site you can search for virtually any airline that was ever in existence and find a 1-3 page history on that particular company.
Since I was modifying the Airfix DC-9 and 727 to versions other than supplied, I needed to know what the fuselage lengths were of each. Here I turned to the Boeing web site. From this site I was able to download free PDFs of every civilian airliner Boeing made or makes, this includes now those of McDonnell-Douglas. These PDFs contained scale plans for each version, along with cross sections, placement of passenger and baggage doors and various dimensions.
The last site I use extensively is the Airline Modelers’ Digest. This site has a plethora of information on converting existing models, photographs of what others have done, a great section on tips and techniques and on airliners in detail.
Airliners.Net: http://www.airliners.net/
Airline Modelers Digest: http://kithobbyist.com/amdigest/
Airline History Web Site: http://airlines.afriqonline.com/
http://www.boeing.com/assocproducts/aircompat/plan_manuals.html
http://www.boeing.com/assocproducts/aircompat/flash.html
So that’s how I got deeply into this segment of the hobby. Its been a lot of fun and I’ve learned a great deal about commercial airliners and the hobby in general. I’ve gotten a nice opportunity to expand my skills by attempting several conversions and am becoming comfortable with gloss white and natural metal. If you get the chance, the next time HobbyLobby has one of those 50% off sales, grab a 1/144 scale airliner and give it a try.
SCREWBALL EXPRESS
The story of “Screwball Express” and it’s crew was written by the original bombardier, Mr. Kenneth H. Cassens. The book “Screwball Express” was published by Turner Publishing Company in 1992. All material contained in this article was taken from the book with Mr. Cassens’ permission.
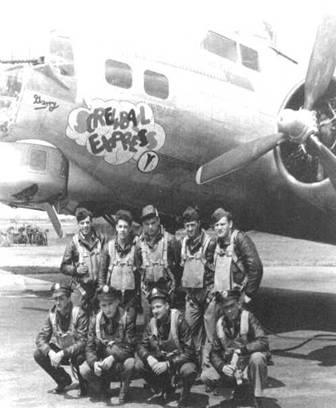
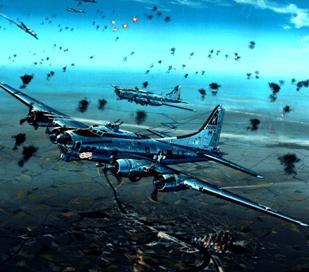
B-17G Screwball Express, plane and crew.
This very special aircraft – a B-17G Flying Fortress – came off the assembly line of Boeing’s Seattle, Washington plant on January 30, 1944 and was accepted by the United States Army Air Corps the following day. Serial number 42-97128 was painted on its vertical stabilizer. On February 2, 1944, it arrived at Cheyenne, Wyoming where it was equipped with special armament, starting with thirteen .50 caliber machine guns. The bomber’s armament also included manual and electrical bomb release racks in the bomb bay, and a gyro-stabilized Norden Bombsight connected electrically to the Automatic Flight Control Equipment. The Norden Bombsight was credited with much of the very successful precision formation bombing from high altitude during the air war over Europe.
This Flying Fortress, like thousands of other B-17s before and after, entered the European Theatre of Operations by flying the northern route from the United States to Newfoundland, Iceland, and finally to Prestwick, Scotland. It was delivered to the 379th Bomb Group at Kimbolton, England on March 23, 1944, and was assigned to the 526th Bomb Squadron. Kimbolton is 11 miles north of Bedford, which is approximately 50 miles north of London.
Screwball Express was code-named Mystic M for Mike and its original crew named it Screwball Express. Its nose art included a white cumulus cloud, with the letters in its name appearing thereon in a variety of bright colors. A large baseball was painted on the lower corner of the cloud and in its center a bright red screw. Screwball Express received its unique name because its baseball-loving crew believed that with the capabilities of this sophisticated, heavily armored aircraft, it could deliver a screwball pitch the enemy would be incapable of hitting and that it would do so with “express dispatch.” A bit corny? Perhaps – but we understood the meaning and we liked it.
Ours was the original flight crew of Screwball Express. Records of the 379th Bomb Group indicate Screwball Express flew its first 107 missions over enemy-occupied Europe without an abort. It was on operational status for 376 of its 431 days of existence.
Many times it was so riddled with holes caused by enemy machine gun bullets and antiaircraft shell fragment that flight was nearly impossible. It brought its crew back to England on many occasions when hope for a safe return to its home base at Kimbolton seemed unlikely. This B-17 – like all B-17s – was a verifiably tremendous aircraft.
The United States 8th Air Force, 1st Bombardment Division, 41st Combat Wing, 379th Bomb Group, 526th Bomb Squadron, Lt. Howard Towers’ flight crew, Screwball Express. The sound of those names generates a feeling of great respect within me. I am especially proud to have been a part of each of them.
The story of Screwball Express and the details about its early combat missions would be incomplete without relating numerous incidents involving its original combat flight crew. Some of those incidents were happy – some were sad – a lot of them were funny – too many of them were horrifying. In addition to its engines, fuselage, instruments and armament, its original flight crew was an integral part of this B-17.
Tuesday, June 20, 1944. A few minutes after midnight the door of our barracks flew open and light bulbs flashed on above our bunks. “Up and at ’em,” blared the voice of someone who apparently enjoyed exercising his authority. “You’re all flyin’ today. Climb out of those sacks! Rise and shine!” The intruder was from the 526th Squadron Headquarters.
We dressed and hurried to the mess hall. Although we always had plenty of time to eat a leisurely breakfast and walk calmly to the briefing room, none of us ever did it that way. It was not the Air Force way of transporting one’s self from a sound sleep to the excitement of a combat briefing. Consequently, most of us were in the briefing room fifteen or twenty minutes ahead of schedule. Today’s briefing was scheduled for 0130 hours; all of our crew were in front row seats at 0110 hours.
Much of our 20 minute wait was spent making predictions about the location of today’s target. The amount of yarn used to plot the flight plan on the map at the front of the room indicated a flight of medium distance. It seemed like hours before those twenty minutes elapsed. The briefing began and, after a few opening remarks by the commanding officer, the sheet was drawn open and the map was uncovered. Our target was at Hamburg, Germany!
We were told that the 8th Air Force campaign to destroy Germany’s oil resources was destined to reach a climax today. Over 1,400 Fortresses and Liberators were assigned to smash a dozen refineries and synthetic plants. A force of nine Combat Wings, escorted by three fighter groups, was assigned to attack eight oil refineries in the Hamburg area. A second force of six Wings, escorted by six fighter groups, was dispatched to attack synthetic oil plants at Politz and an oil refinery at Ostermoor. A third force of eight Wings, escorted by seven fighter groups, was dispatched to attack an oil refinery, a wing repair/small engine works, a synthetic oil plant and an army truck ordnance depot in north-central Germany – specifically in the areas around Magdeburg, Fallersleben, Konigsborn, and Hanover, respectively. Our intelligence staff knew the Germans had moved thousands of antiaircraft guns into areas around the oil targets, and some of the refineries were protected by more antiaircraft guns than Berlin itself. Unquestionably, the Germans would do everything in their power to protect their refineries and synthetic oil plants. Oil was the lifeblood of the Nazi war machine, and the Germans had to keep it flowing.
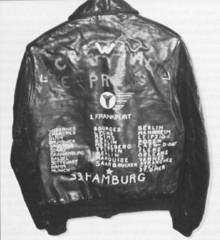
Kenneth H. Cassens’ A-2 Leather Jacket
The 379th Bomb Group furnished 18 Fortresses, including two spares, for the Lead Group and an additional 24 Fortresses, including six spares, for the Low Group in the 41st “A” Combat Wing to attack an oil refinery at Hamburg. The High Group of our Wing was provided by the 305th Bomb Group for Chelveston. The pilot in the Lead aircraft in our Lead Group was Brigadier General Robert F. Travis. Screwball Express and our crew were also assigned to the Lead Group and flew the Group Deputy Lead position. The 42 B-17s from Kimbolton started taking off at 0505 hours as part of the first of three separate forces assigned to destroy Germany’s remaining oil production plants. This was combat mission number 148 for the 379th Bomb Group.
Fear still had its hold on me. I probably wasn’t the only one. As the four Wright-Cyclone radial engines roared with the combined thrust of 4,800 horsepower, I started to sing one of my favorite songs – The 23rd Psalm. The following words of that Psalm seemed especially proper. “The Lord is my shepherd; I shall not want. He maketh me to lie down in green pastures. He leadeth me beside the still waters. He restoreth my soul. He leadeth me in the paths of righteousness for His name’s sake.”
Weather over England duplicated the low ceiling and cloudy skies of the previous day. After we left the English coast the clouds opened to about 6/10 undercast and we were able to see the cold, unfriendly grayness of the North Sea. At the enemy coast the clouds separated some more and formed only 3/10 cover. Visibility ahead of our formation remained unrestricted.
We did not encounter any flak during our flight into Germany. All of the Fortresses of “A” Wing reached the Initial Point on schedule and turned on a magnetic heading of 266 degrees toward our target. We were flying at our briefed altitude of 25,000 feet. Bomb bay doors opened simultaneously throughout our formation. Each Fortress in our Wing had a bomb load of 12-500 pound demolition bombs.
The antiaircraft gunners around Hamburg were ready for us. Our formation was half way over our visual bomb run when the sky around our Lead Group suddenly filled with hundreds of flak explosions. The first explosions were in the middle of our formation and caused what Frank still describes as the most frightening of all his combat experiences. Gunners on flak towers nearly five miles below quickly and accurately zeroed in on our formation. Four long minutes remained – with no evasive action – before our bombs would be dropped.
“Yea, though I walk through the valley of the shadow of death, I will fear no evil, for Thou art with me. Thy rod and Thy staff they comfort me.”
The intercom overflowed with, “Flak at mid-formation.” “Flak at 12o’clock level.” “Flak at nine o’clock level.” “Flak at three and six o’clock – level.” A flak shell exploded directly above Screwball Express. Frank’s flak helmet was hit by a piece of shrapnel that pierced the plastic dome of his top turret. Howard and Jim stared in disbelief as at several shattered gauges on their instrument panel. A flak shell exploded close to the left side of Screwball Express and knocked out one of Joe’s radios. Another burst directly in front of our aircraft sent a fragment into my chestpack parachute. Tom’s jacket was ripped by a piece that went through the ball turret. Jerry’s intercom and his oxygen supply were cut off by pieces of flak that hit the tail section of Screwball Express. Several oxygen bottles behind the pilots exploded when hit by shell fragments. The control caps of the Automatic Flight Control Equipment were smashed. A window in the waist section and one in the nose compartment were blown out when hit by flak. Mathews was knocked to the floor of our plane’s waist section when the concussion from a burst of flak rocked Screwball Express. Ammunition in my chin turret was hit by flak fragments that set off four or five .50 caliber machine guns directly under my chair. The Plexiglas in front of the chin turret disintegrated. Tom’s exposed position under our plane’s midsection provided him a very disturbing view of more than 400 flashing flak guns belching up their deadly shells at us. There was no need to pinpoint the clusters of exploding flak by yelling their clock-positions into the intercom. Flak was everywhere. We had never seen so much of it, and had never witnessed such alarming accuracy.
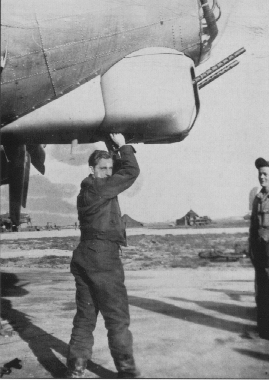
Lt. Ken Cassens checking the nose gun turret
In spite of the tremendous quantity of antiaircraft fire, our Wing’s formation held together. The entire oil refinery, built on five separate dock areas, was clearly visible along the Elbe river. A burst of flak directly under us sent a dozen or more flak fragments through our bomb bay doors. I felt the bombsight’s eyepiece vibrate against my right eye when a piece of flak ripped through the plane’s nose and glanced off the bombsight’s heavy base. The center of the refinery was perfectly centered under the crosshairs of my bombsight. Finally, it was 30 seconds past 0908 hours and our bombs were away at the exact instant of release by our Wing’s Lead aircraft.
“Thou preparest a table before me in the presence of mine enemies. Thou anointest my head with oil; my cup runneth over.”
Visual bombing usually achieved better results than the PFF method; however, bombing through clouds did not require us to fly straight and level after bomb release in order to take photos of the bomb strikes. The visual method was more accurate and shortened the war. The PFF technique attained only fair results, but resulted in many airmen living longer. Our indicated airspeed was 150 miles per hour and our true airspeed was 224 because of the lighter air density at the altitude we were flying. Our ground speed was 257 m.p.h. because of a tail wind. As fast as that was, it wasn’t fast enough. Six B-17s from the Bomb Groups behind our formation were hit by flak and went down at the target and the area around Hamburg.
A total of 144.5 tons of bombs from the attacking Fortresses in our Wing hit directly in the center of the refinery. What a sight! We saw waves of air around the target rush outward as the bombs exploded. It looked like every explosion set off another explosion, or started a fire the touched off an explosion. The main processing plant received many direct hits by our Group. Three oil storage tanks exploded in a flaming eruption. Two storage buildings and three other structures were hit and destroyed. Smoke rose thousands of feet into the sky. It was a fascinating view of total destruction. It was the end of Hamburg’s Rhenania-Ossag oil refinery.
Our formation turned away from the target and headed for England. The doors of our bomb bay were bent out of shape by flak damage and would not close electrically, so they had to be manually cranked into a closed position. Like the flight into Germany the flight out was without flak. The intense antiaircraft fire on the bomb run during the attack at Hamburg turned 11 minutes of this mission into a horrible nightmare. Although Screwball Express was heavily damaged, Howard and Jim assured the rest of our crew we would make it back to Kimbolton. Nevertheless, we contemplated dumping some of our heavy equipment into the North Sea in an effort to lighten the load and help our pilots’ prediction come true.
Painting by Raymond Waddey
We were extremely thankful for the very fine landing of Screwball Express at Kimbolton shortly after 1300 hours. I’m certain all of us said a prayer of thanks for being alive. We crawled out of Screwball Express when it came to a stop on its parking pad and began to survey the damage. Our Flying Fortress was a multitude of holes held together by ragged metal. Gasoline was dripping from holes in a Tokyo tank and from two of four damaged wing tanks. Two oil tanks were also damaged. The wings looked like a pair of sieves. The landing lights were missing from the wings. It was apparent the outboard engine in the right wing would have to be replaced. Our crew members, assisted by our ground crew, counted 287 flak holes in Screwball Express.
“Surely goodness and mercy shall follow all the days of my life, and I will dwell in the house of the Lord forever.”
Flying time on our 33rd combat mission was logged at exactly eight hours. Seven hours and 49 minutes of that were relatively uneventful. The other eleven minutes were hell. Thirty-six of the 42 planes on this mission from the 379th Bomb Group sustained flak damage. Screwball Express was in much worse condition than any of the other returning Fortresses in our Group. We stared again at the tremendous amount of battle damage it had received, and were then trucked to Headquarters for 30 minutes of debriefing.
On the following morning, June 21, 1944 – over half a century ago – I stood in front of Screwball Express. Our ground crew was busy with the myriad of repairs that had to be made to “our plane.” I considered it a distinct privilege – a special honor – to stand before the severely damaged aircraft. It had provided a tremendous service to those of us who were members of its original flight crew. Screwball Express had continuously stood behind us during 217 hours and 35 minutes of combat flying. We will forever be deeply indebted to, and extremely thankful for, that wonderful flying machine. Our crew flew an additional 24 hours and 50 minutes in four other Flying Fortresses, for a total of 242 hours and 25 minutes of combat flying time.
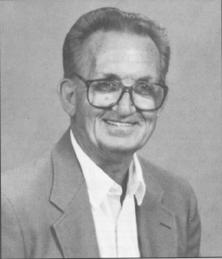
The Author, Kenneth H. Cassens
If you would like to view Mr. Cassens’ web site devoted to the Screwball Express, please visit http://www.erinet.com/dbarber2/ScrewballExpress/index.htm
NOTE: Webmaster note – March, 2023 – The link above appears to be broken. I made an attempt to contact the arinet domain administrator to see if the information is still available online but have not received a response to date. Unfortunately, while the Worldwide Web is an incredibly useful tool, where it’s relatively easy to publish information, it’s equally easy for information to disappear, as in this case. There’s definitely a case to be made for retention of paper documents.
As an alternative, here is a link to a biographical entry for Mr. Cassens at the American Air Museum in Britain website.
https://www.americanairmuseum.com/archive/person/kenneth-henry-cassens
